Friday, April 30, 2010

Welcome to the Pink Paislee Inspriation Tour!!

Welcome to the Pink Paislee Inspiration tour in honour of Mother's Day. We have lots of ideas for making a mother's day present or a present for anyone in you life. Pink Paislee has generously offered up a prize package (shown above) to one lucky commenter on each blog so take the time to visit the DT blogs and leave comment on each one. You have all weekend to leave a comment and a winner's name from each blog will be drawn on Monday, May 3.


A grandchild is a gift

I created an altered wall canvas for my project. (yes, a gift for my Mama) It is something that I have always wanted to try but just didn't seem to get it done so I was happy for the incentive to create this. I used a cheap canvas (12"x16") from the dollar store that had a bit of a smooth finish to it. The coating on the canvas worked out great in my favour as I was able to smoosh around mist after I sprayed it on to achieve the look I was going for. I am going to give you step by step instructions so that you can recreate this project. My fellow DT members have done the same on their blogs so that you can replicate any of the projects on the tour!


1) Spray Glimmer Mist and Maya Mist on background. Use a sponge or paper towel to blend the mist colours and smooth/smoosh the ink around. I used red and pink mists.

2) Cut the top 3.5" off the Porch Swing die cut from the Bayberry Collection and adhere the die cut to the right hand side of the altered canvas. I found that my regular adhesive did not adhere the paper to the canvas very well so I used my trusty hot glue gun!

3) Add two 3"x4.25" photos to the bottom right of the die cut.

4) Underneath the photo, layer artisan tape, clear border stickers and pleated ribbon . I used dimensional glitter paint to put a dot in each section of the pleated ribbon.

5) Adhere flowers to the bottom left of the photos. Add three pieces of cork which are slightly tucked under the flowers.

6) Add press ons to the left of the flowers. I set a book under the canvas so it was easier to adhere the rub on. This stopped the canvas from stretching when I pressed on it.

7) Cut a flourish from Bayberry Cottage Flower Garden and adhere it above the flowers. I added Stickles glitter glue to the flourish (Diamond & Onyx).

8) Add title to the top of the die cut. I used Expressions glitter alphabets. I also used a Heidi Swapp clear clock die cut under the title.

9) Add three pieces of cork to the upper right hand corner of the photos.

10) Wrap it up and give it to your Mother with a hand made card :)

**********************************************************

Tuesday, April 27, 2010

Starlight by Pink Paislee

Well this is my little soccer star last spring. She was in a fun little coed group for 3 & 4 year olds and boy were they cute!! They mostly did little games and drills with the ball but they did attempt a scrimmage at one point and it was so funny... the kiddies couldn’t understand why they all couldn’t have a ball.

I am excited to show off Pink Paislee’s new Starlight collection. These new papers were so much fun to work with. I found that many elements from other Pink Paislee lines worked perfectly with Starlight. I used the cork from the 365 degrees line and a brad from the Bayberry Cottage line. For the title, I used three different Pink Paislee alphabets. I applied Stickles glitter glue to the chipboard title and attached a star piece of cork. Instead of O’s in the title, I used stickers from the Starlight collection.


Photobucket

Thursday, April 15, 2010

our little fashionista

This is the second layout that I did for Scrapbook Dreamer as their April guest designer. To create the background on this layout, I used four different pieces of pattern paper and pieced them together before cutting the shape of the layout. I sure had fun playing with the beautiful Webster's trim that Scrapbook Dreamer sent me! The little brown dots along the die cut were done with cinnamon Stickles.

These snapshots are typical of Larissa's clothing choice... wings, ballerina tutus, plastic jewelry...she has a very unique sense of style!


I created these leaves but cutting out leaves from pattern paper and using my hot glue gun to adhere the green ribbon around the edges.

Photobucket

Wednesday, April 14, 2010

Scrapbook Dreamer

I was recently asked to be a guest designer for Scrapbook Dreamer. They sent me some beautiful supplies to work with and this is my first layout for them. The paper, trims and alphas here are Webster's Pages, Postcards from Paris. When I saw these papers, I just knew what photo I was going to use. I had visions of cutting the hot air balloons from their pattern paper but I couldn't seem to work that into the layout. The base of the layout is pattern paper with a layer of printed vellum over it. My favourite part of this layout is the loopy pink trim! I'd use pink loopy trim on every layout if I could get away with it! To create the photo in the shape of a circle, I printed the photo as an 8.5x11 and used a Crafter's Workshop circle template to trace around the photo. I cut it out by hand inked the edges with Stazon ink. The blue circle layer has glimmer mist on it, thanks to my friend Zoe who brought all her beautiful glimmer mists when she came over to scrap with me! I journaled around the photo in the blue layer.

This photo is from last summer. Larissa and her little cousins were outside playing and started screaming!! I came running but thankfully it was screams of delight because there was a hot air balloon so close to our house. They were hollering at the balloon man to come closer so they could play with the really big balloon. Then they spent the rest of the evening asking me if I could get them a really big balloon to ride around in. I think someone very close to us must own the balloon because we saw it around almost everyday after that first time.


Stay tuned for more work with these products shortly :)

Photobucket

An album to share

This is My Creative Scrapook's April album kit. It's full of beautiful embellishments and Bella Blvd Estate Sale papers. A really nice touch in this kit was a generous piece of pink gingham fabric. I really enjoy the extra texture it adds to a project.

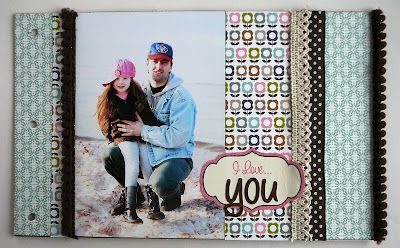
Well who would have thunk it? LOL Yes, another mini album!! I must admit, I am slowly losing my fear of mini albums. You may even see more of these from me in the future ;) All these photos were from a beautiful MARCH trip to the beach!! Yes, that's right, MARCH! Now that saying something considering I'm in north eastern Canada. One this beautiful day, we spent hours exploring the sea shore, the small patch of ice that was along the shore and the dunes. Normally the entire beach would be snow and ice covered and the water would be still frozen.

Larissa was picking up small ice crystals.... "REAL crystals" as she would call them. I love this age when absolutely everything is full of wonder.

This photo is DH & Larissa listening to the ice crackle as it melted. Larissa thought it sounded just like her Rice Krispies "Snap Crackle Pop"

The 3 of us attempted a self portrait...lol..these never turn out but that's ok...as long as we're in there together!

Photobucket

Tuesday, April 13, 2010

My Creative Scrapbook - Limited Edition

I had so much fun playing with My Creative Scrapbook's this month! It was just loaded with Pink Pailsee Bayberry Cottage goodies, Prima flowers and beautiful ribbon and lace. I made a lot of projects with this kit and still have quite a bit of it left!


More altered jars... these little jars where made from old ice tea jars and now reside in my kitchen. Did you know that to colour the lids black I was using a Sharpie pen. How ridiculous is that!?!! I was at Walmart on the weekend and finally picked up some quick drying black spray paint so it should make my job go a lot quicker next time I make altered jars!

She... makes my heart smile: I just love this photo of Larissa in a little roller coaster at a local amusement park (Shining Waters) last summer. She spent the better part of the morning riding this tiny roller coaster by herself...over and over and over again. It was also the scene of the crime when it was time to leave and she took a massive roll-on-the-ground-screaming temper tantrum. Boy was that embarrassing!


FLY: I snapped this photo of Larissa last spring. She was flying a cheap little princess kite at a church potluck. The Pink Paislee Bayberry Cottage paper just begs to be cut out into individual flourishes. To create the round photo, I printed an 8.5x11 and used a Crafter's Workshop circle template to trace and cut the photo. I was really excited when this layout was the featured layout at 2peas last week!


I snapped this photo of Larissa and DH just before he went on a trip for work. For the centre of the flower, I used a little square chipboard piece from the Pink Paislee houndstooth alphabets. I love when alphabets have little extras on them. I used them on the right hand side of the photos as well.

Photobucket

Monday, April 12, 2010

her first haircut


I created this layout for Pink Paislee using their beautiful 365 Degrees collection. It was created for a Word it Wednesday so I chose the word 'first' to make my layout. Having a little girl gives me lots of firsts to scrapbook. This layout is about her very first haircut recently. It’s hard to believe that Larissa is 5 years old and scissors had never touched her hair. She had long, beautiful hair with ringlets at the bottom. I just knew that after her first haircut the ringlets would be gone so I held off as long as possible. She was a little nervous about it at first, even asking ‘will it hurt?’ She ended up loving the whole experience. Of course, it certainly helped that she was center of attention at the salon and was totally pampered. I still need to do another layout that shows her pretty long curls because I saved little lock of hair from that day. She had about 6 inches or so cut off which still leaves her with hair all the way down her back, just not covering her butt, and without the curls :(

To get the photos shaped like this, I used a photo collage downloaded from scrapbooks etc.


Photobucket

Monday, April 5, 2010

My Creative Scrapook - April

Oh I am so happy April has arrived!!! Usually April on PEI is still VERY wintery with lots of snow and even snow storms. This April has been amazing so far! We were able to have our very first Easter egg hunt outside and it was a beautiful 20 degrees Celsius. A temperature of 20 is amazing since the regular daytime temp for this time of year would be around 4.

I'm excited to show off a beautiful springy kit by My Creative Scrapbook . This is their main kit featuring lots of Webster's Pages goodies. Here is what my fellow DT members created with this kit.
Beautiful Summer: This is snapshot from last summer of Larissa playing at Pugwash, NS beach.


Window Writers: I bought Larissa a package of Crayola window writers last summer and she made it a point to write on the windows everyday..usually while wearing a princess dress :)


Great Aunt Flora: This is my Aunt Flora (Auntie Flower as Larissa would say) with Larissa last summer. I found this sweet photo and just had to scrapbook it. Aunt Flora just celebrated her birthday on Easter Sunday so this is a shout-out to say Happy Birthday!!! :)


I hope you are all enjoying your spring so far and that the weather has been beautiful wherever you are!

Photobucket