Thursday, April 30, 2009

The Coconut Dress

This layout makes me giggle :) First things first...journaling reads: It is so cute that you call this your coconut dress...for some reason everything that is polka dots gets called coconuts. Too cute!! '09

I really love the things that come out of the mouth of a 4 year old...actually she has been using the word coconuts instead of polka dots for some time now but we just caught on to what she has been saying.

I must say that I jumped at the chance to use polka dots and this colour combo too! This is my all time scrappy colour combo (red, white, black & pink) I would be quite happy to scrap these colours forever... ever notice how I make an insane amount V-day layouts...it's b/c I love these colours. I used some of my favourite cardstock on this layout...Bazzill polka dot texture. I also used some of my new Jillibean soup letters. I never noticed just how many polka dot pattern papers I have until I started looking for papers for this layout....and I have a ton more. These were just the ones that I had in red!


Wednesday, April 22, 2009

Easter works

Last weekend at the crop, I didn't exactly get much done...actually I didn't finish a layout (except the class I taught) but I half finished this layout. When I got home I finished it up. Larissa just loved wearing these bunny ears for the photo..so different from a few years back when she would just rip them off her head as soon as I put them there LOL. I decided to use a little vellum on this layout..something that I used to do a lot way back when. I realize that my title is as cheesy as them come but I couldn't think of anything else so Some Bunny Special it is ;)


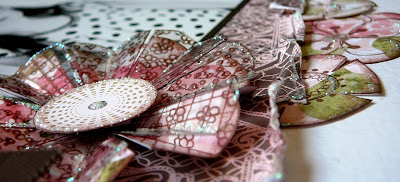
I used glossy accents and micro beads (no hole) to dress up this chipboard a little (if you click on this close-up you can get a better view of the beads :)


Monday, April 20, 2009

Crop Class Layouts

Hi ya'll! I'm back from the Paws on Scrapbooking crop in New Brunswick and have a few layouts to share with you. I had so much fun there...didn't get much accomplished other than gabbing and eating but I still had a blast!! Here are the two layouts that I made for the class I had..thank you so much to all the gals that took the class. They were so much and made teaching the class so easy.


Thursday, April 16, 2009

* Tweet *

Here is some DT work that I did for Upsy Daisy featuring their ever-so-sweet Tweet line. I really love the soft blues mixed with the greens and browns...definitely one of my favourite Upsy Daisy lines. I used lots of Tweet rub ons here too...the little bird in the centre of the flower and the little journaling spots that I used as embellishments.

I used a couple decorative pins through the bow and I put a little dab of hot glue on the end of each pin so it wouldn't stick me or the page protector (that is when it eventually makes its way into an album)
And some more altered mason jars...as you have probably noticed, this is one of my favourite little projects to do. These jars were: Classico spaghetti sauce, baby sweet potatoes and honey garlic sauce, respectively :) The little pretties will not stay in my possession for very long..they are being gifted very soonly (although I will be a little sad to see them go) ;)

Friday, April 10, 2009

Layout Class

Paws on Scrapbooking has their Spring Crop coming up. If you are attending you may want to check out a class that I am teaching. You will get all the supplies you need to make 2 layouts and you will get to take home your stamps, ink and Stickles which are included with your class kit. Sign up is here and there are a couple spaces left!

A new mini album

I have a little mini album to share with you. I find usually avoid making mini albums ...not that they are difficult but they are just not my choice of project (but I always love the end product!) This one is for my friend K'mwee and I have no idea if she even knows what scrapbooking is?!? Well, she will now!! As a birthday gift, I made a page for each of her children, plus one page of all the children in their church class (you can Larissa & Keaton in there as well). I used a Basic Grey album as the base. I must admit that I will be a little sad to part with this little pile of paper, stickers and ribbon. I have it for one more day before I gift it away.

Front Cover:

Inside the front cover:
and the back cover:

Wednesday, April 8, 2009

it's true...it's purple!

GASP..do not adjust your monitors...yes this is really a purple layout!! Something that you will rarely see from me and something I never think to make on my own. For those of you who don't know, I have a long standing dislike of purple and find it very hard, almost impossible to work with. It's fine when other people have purple layouts, it's just not something I like to do. I have worked with it occasionally but that is simply because I have a little girl and it is unavoidable at times. So, my scrappy pals at Paws on Scrapbooking issued a very personal challenge to me... Scrap a purple layout without any flowers!! Thank God that I had this polka dot texture Bazzill in a paper pack b/c it made the job a little easier. I just love this cool texture. I painted the background to matte the photo and also to show off the texture. I actually found it easier to work with the purple then the no using flowers rule. Overall I am quite pleased with how it turned out...not that I am likely to start churning at purple layouts anytime soon LOL.


Journaling reads: When we went camping you just loved eating all your meals outside....so much so that when we got home you insisted on eating all your meals outside at the picnic table on the deck. Larissa, Summer 2008

Tuesday, April 7, 2009

and another kit to share!! My Creative Scrapbook Limited Edition

And another amazing kit from My Creative Scrapbook!! This particular kit is sold out already ... they go FAST FAST FAST!!! .... but if you are wanting to get on the list for a subscription to MCS's gorgeous limited edition kits here is some information for you..... As of March 15th we are now selling the Limited Edition kits as a three month sub... the next sub available is June, July and August. To be put on the waitlist for this sub please e-mail us at MyCreativeScrapbook@gmail.com and put Limited Edition in the subject line of your e-mail.

Here is what I did with the kit so far:

Sisters: My sister Jocelyne and I on her wedding day :) I just love all the extra embellies with this kit..the Prima flowers, beads and lace...totally my style.


Our Little Poser: Larissa is a complete camera ham and starts posing as soon as I start clicking.


And this is my favourite thing that I made with the kit.... a little altered sign for my kitchen. My friend Cindy started making all kinds of gorgeous wall hangings with little signs purchased from the dollar store so I am following in her scrappy footsteps!

Monday, April 6, 2009

My Creative Scrapbook - Main Kit


My Creative Scrapbook has just unveiled their main kit for April and it is AMAZING! This is one jam-packed kit as you can see...look how many goodies are in there! Here are a couple of layouts that made with it and I plan on making several more with the rest of the kit.

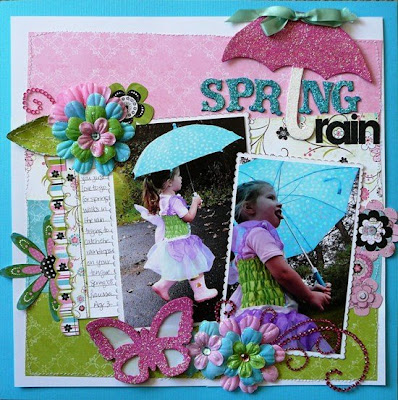
Spring rain: These photos just make me smile. I love the one of Larissa with her tongue hanging out... she figured she could catch some rain drops on her tongue just like she catches snowflakes in the winter. As you can see, lots more glitter here and some gorgeous Zva pink crystals :)


Sweet Innocence: This photo is Larissa and her cousin Keaton dancing on a man hole cover. This was right after my sister's wedding ceremony and just before we were having our pictures done.

I attached vellum behind this butterfly b/c it the background behind it was too busy but I still wanted to be able to see all the pretty details on the butterfly. I really like how it turned out :)

And a little wedding card made with a part of one of the BoBunny papers :)

Sunday, April 5, 2009

My Creative Scrapbook - Creative Kit

It's time for the reveal at My Creative Scrapbook!!! In this post, I have featured the items I made using the Creative Kit which features My Minds Eye Penny Lane collection as well as some gorgeous chipboard by Creative Cafe. This chipboard was a dream to work with...three 12x12 sheets of florals, swirls and shapes and they are already white so it saved me the effort of painting all the chipboard that I wanted to use. Of course, I hauled out my bucket of glitter and put it to good use. This kit also has some yummy extras like BoBunny flowers and Creative Cafe stickers. Head on over and check out the amazing gallery this month!

The best gift: Larissa truly is the very gift we have ever been blessed with...I want her to always know this so I just added a little love note for her. The Thickers that came in the Creative kit were white so I just used my Zig photo pen to colour them red with a few white dots added with my Signo White Uniball pen. (ummm... I think I already scrapped this photo ... I just noticed this now...LOL)

I recently found this older photo of Larissa and her cousin Keaton (from 2 years ago) and just had to scrap it... they are so freakin cute together :D


Fly a kite: I just love this layout even though it's not really my normal style. These photos are from a kite flying family day we attended in June '07. It was a gorgeous spring day and we spent quite a few hours relaxing, flying kites and watching others fly their amazing kites. We actually won a prize for the best Canadian kite.... the funny part is that we bought it at Canadian Tire for $5...we won the prize b/c we were the only ones with a Canadian kite...LOL!! I was so proud of this little die cut kite I made. I just drew it out on pattern paper, cut it and trimmed it with white cardstock and scalloped sissors and then stitched the kite string and added some cute little bows. Of course, the entire time I was scrapping this layout, I was singing the Mary Poppin's Let's go fly a kite...up to the highest heights (I watched that movie a hundred times or more when I was a kid) :)

And here's a (very heavy) card that I made with some of the scraps. I used Staz-on ink to stamp on the petals of the flower and then used a Zig Photo Pen to colour in the red areas. .